<p style="text-align: justify;">When your hard drive goes bonkers, more often than not, the first thing you will presumably consider is purchasing a new one. That is until you realize you didn&#8217;t back up your data; then panic sets in. And for good reason. Imagine all those files &#8211; from family photos to financial information and everything in between &#8211; all gone poof into the thin air. The value of these data to you or your business is absolute.</p>
<p style="text-align: justify;">So your hard drive has crashed. You are not alone; many hard drives crash every day for myriad reasons. From elements, overheating to power surges, the list is endless. Chances are if your motor or disk-head hasn&#8217;t been tampered with, the culprit could be printed circuit board (PCB) or controller board.</p>
<p style="text-align: justify;">While PCB can easily be replaced, the venture could damage your disk permanently if it isn&#8217;t the cause. Check out for obvious hints like scorch marks to be rest assured. When you have established that PCB is faulty, here is a stepwise approach to fixing it.</p>
<h4 style="text-align: justify;"><strong>Step #1: Write Down Disk Details</strong></h4>
<p style="text-align: justify;">You will need to get hold of an identical PCB replacement; otherwise, the fix won&#8217;t work. Take down drive details including manufacturer, model number, firmware code, site code, P/N, date code, and the Main Controller IC code. A square black chip on the PCB has all these details.</p>
<h4 style="text-align: justify;"><strong>Step #2: Purchase PCB Replacement</strong></h4>
<p style="text-align: justify;">The heavy lifting comes after garnering the PCB details. To shop for an exact replacement, ensure that the P/N or Main Controller number matches. When you receive your order, make sure that there are installation manual and Torx screwdriver alongside PCB replacement.</p>
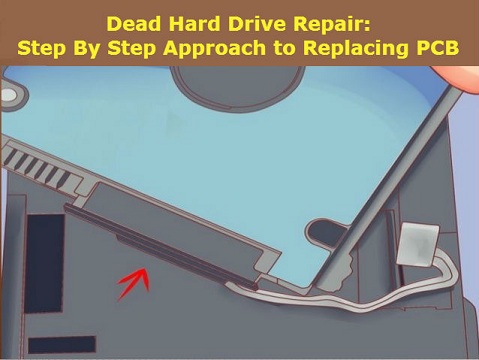
<h4 style="text-align: justify;"><strong>Step #3: Detach the Old PCB</strong></h4>
<p style="text-align: justify;">To remove the old PCB, undo the five screws attaching it to the drive using Torx screwdriver. You can use a zip-lock bag to secure the screws owing to small size. Exercise caution lest you damage other delicate components like the platters.</p>
<h4 style="text-align: justify;"><strong>Step #4: Attach the New PCB</strong></h4>
<p style="text-align: justify;">Use anti-static wristband as a grounding measure to avoid damage to the new PCB. Also, remove it from the bag with utmost care. Now, place the new PCB onto the hard drive ensuring that all screw holes are in proper alignment. Screw the PCB down making sure that each screw is suitably tight.</p>
<p style="text-align: justify;">Now that you have replaced the PCB, it&#8217;s time to take it for a test drive. Slot it back into your computer; if it&#8217;s an external drive, plug it into the machine. Your hard drive should be recognized correctly if the faulty PCB has been fixed. Remember to backup your files ASAP.</p>
<p style="text-align: justify;">Hard drive repair isn’t a DIY job. To avoid further damage to your disk, let the professional to it. Scorpion Computers of Philadelphia has unmatched experience and reputation in this arena. To learn more, visit Philadelphia Computer Repair.</p>

Dead Hard Drive Repair: Step By Step Approach To Replacing PCB